Posted on 4 Comments

What’s the deal with the File Browser tab in Decent Sampler?

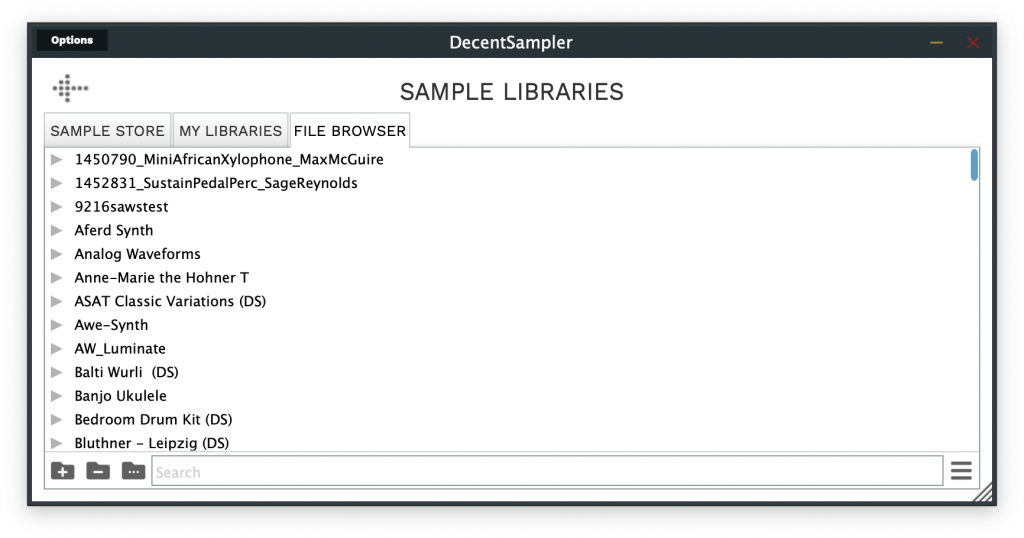
So, the latest version of Decent Sampler (1.7.6) has a new tab within the BROWSE screen called File Browser:

The Decent Sampler File Browser tab
The Decent Sampler “File Browser” tab

This looks and functions almost exactly like the My Libraries tab. In fact, I’m hoping that we will be able to get rid of the My Libraries tab in favor of the File Browser soon, and when that happens I will probably just rename File Browser back to My Libraries and new users won’t know the difference. Both the File Browser and the old My Libraries aim to allow users to manage and load sample libraries from their own personal collections, but there are important differences in the way the two tabs work which is why I’m writing this post.

What the My Libraries tab was meant to be and where it fell short

Under the hood, Decent Sampler maintains a small, lightweight database that contains the locations of all of the sample libraries in a user’s personal collection. The plan was originally that the My Libraries tab would be used to manage this database. Every time a user loaded a Decent Sampler library, it would be added to the database, and from that point on it could be managed within the My Libraries tab. The My Libraries tab even offered the possibility of creating virtual folders to help with organizing sample libraries. This seemed like a great solution until I tried to use it for an extended period of time (I’m not only the creator of Decent Sampler, I’m also an avid user).

For desktop users, it is much easier to manage a folder containing many sample libraries using the tools provided by your operating system. Users (including me) would rename sample libraries on disk, delete them, or move them into folders that made logical sense. In such situations, the result would be that the reality as reflected in the database was often be different than what was on disk, and it was often difficult or even impossible to sync them up. To make matters more complicated, iOS users didn’t have the option of using the OS to manage their files well because, due to iOS limitations, all of their DecentSampler libraries are stored in a siloed file container called an AppGroup. Since the AppGroup is not accessible by the iOS Files app, users literally had no way of managing their files other than my using the My Libraries tab, which meant that if something went wrong with the internal database, they would be completely in the dark and stuck with useless files that were using up their precious device storage.

The Solution: The new File Browser tab

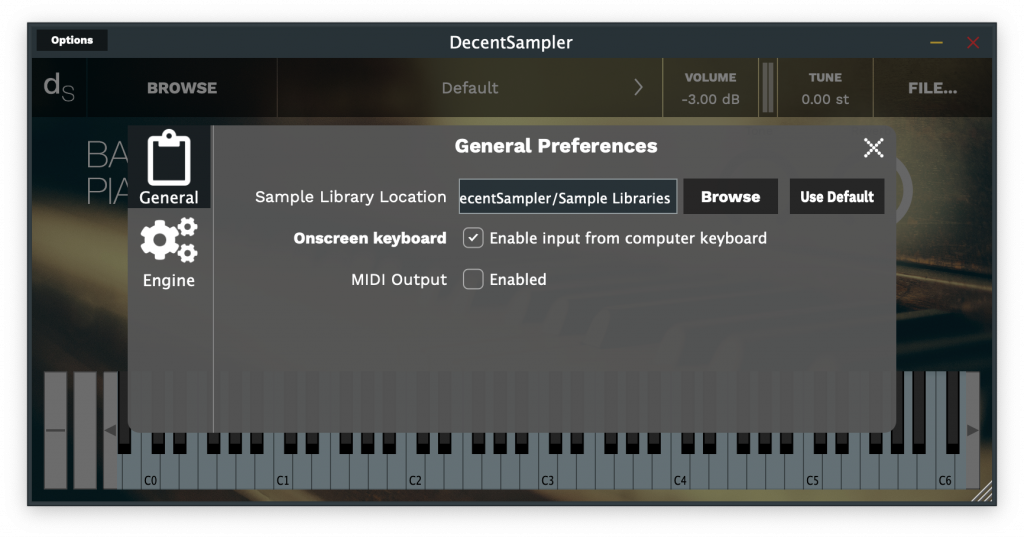
The new File Browser tab offers an accurate picture of whatever is stored in your Sample Libraries folder. For desktop users, this is the folder that you specified when you first launched the app, or that you chose in the Preferences dialog box. If you’re not sure where your Sample Libraries directory is, you can check its location by going to the Preferences dialog box and looking at the Sample Library Location entry (this option is not available on iOS):

Choosing a new sample library location in the General Preferences dialog box

As mentioned earlier, the new File Browser tab aims to provide an accurate list of the folders and files as they exist on disk. In the bottom left-hand corner are three icons which allows you to create, rename, and delete folders.

The add, remove, and rename folder buttons

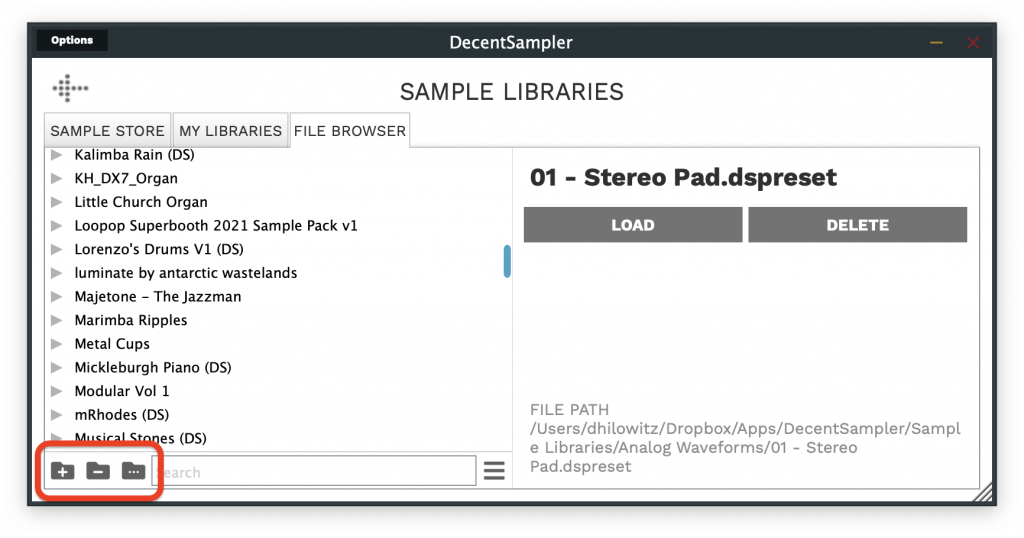
Unlike the folders that are created in the My Libraries tab, the folders in the File Browser are real folders that exist on disk. Be careful, if you delete a folder containing a bunch of sample libraries, the sample libraries contained with will be deleted as well (just like they would be on your operating system).

This view is very much a work in progress. (For example, at the time of writing, the search functionality is very slow on the file browser tab because every time it performs a search, it goes through the entire tree. This will be fixed in upcoming versions.) I wanted nonetheless to share the work in progress to let you all know the direction I’m hoping to take, as well as to get feedback from users and developers.

Enjoy!
– Dave

Posted on Leave a comment

For Sample Creators: How to use the Wavefolder and Waveshaper effects

Oscilloscope view of a sawtooth wave form that has been folding back on itself.

Decent Sampler v1.7.3 introduces the new wave folder and wave shaper effects. These can be used to add extra harmonic content to your signals (aka distortion). What both of these effects have in common is that they usually sound much better when applied to a single voice rather than to an entire signal. In Decent Sampler, it is possible to apply effects at the voice level by attaching them to groups. Since each group is triggered independently, they do not share effects. In other words, each time you hit a key, a new copy of that voice will be created.

Wave folder

The wave_folder effect allows you to fold a waveform back on itself. This is very useful for generating additional harmonic content. Here is what that looks like in practice:

Oscilloscope view of a sawtooth wave form before wavefolding
Sawtooth waveform before wavefolding
Oscilloscope view of a sawtooth wave form after wavefolding
The same sawtooth wave form after wavefolding

These are the parameters that can be controlled:

AttributeTypeValid RangeDefault
typeRequiredMust be wave_folderwave_folder
driveOptionalThe volume of the input signal1 – 100, where 100 means the signal is amplified by a factor of 100 and 1 means no amplification is applied1
thresholdOptionalThe amplitude above which wave folding should take place0 – 10.00.25
Wavefolder parameters

Because wave folding tends to sound better when applied on a per-voice basis, it usually makes sense to set up the wave folder at the group level (separate group effects get created for each keypress). Example:

<?xml version="1.0" encoding="UTF-8"?>
<DecentSampler pluginVersion="1">
  <ui>
    <tab>
      <labeled-knob x="180" y="40" label="Drive" type="float" minValue="1" maxValue="100" textColor="FF000000" value="1">
        <binding type="effect" level="group" groupIndex="0" effectIndex="1" parameter="FX_DRIVE" translation="linear" />
      </labeled-knob>
      <labeled-knob x="280" y="40" label="Threshold" type="float" minValue="0" maxValue="1" value="1" textColor="FF000000">
        <binding type="effect" level="group" groupIndex="0" effectIndex="1" parameter="FX_THRESHOLD" translation="linear" />
      </labeled-knob>
    </tab>
  </ui>
  <groups>
    <group>
      <!-- samples go here -->
      <effects>
        <effect type="lowpass_4pl" resonance="1" frequency="500" />
        <effect type="wave_folder" drive="1" threshold="1" />
      </effects>
    </group>
  </groups>
  
</DecentSampler>
Code language: HTML, XML (xml)

Waveshaper

The wave_shaper effect allows you to apply standard tanh waveshaping to your input signal. Here are some examples what that looks like in practice:

An oscilloscope display of an example of sine wave before wave shaping is applied.
A sine wave before wave shaping is applied
An oscilloscope display of a sine wave after wave shaping is applied.
A sine wave after wave shaping is applied

There are a few parameters which can be controlled:

AttributeTypeValid RangeDefault
typeRequiredMust be wave_shaperwave_folder
driveOptionalThe amount of distortion. This really just controls the volume of the input signal.1 to 1000 where 1 means no change to the input signal and 1000 means the amplitude is multiplied by a factor of 1000.1
driveBoostOptionalChanges the character of distortion that gets produced0 – 1.00
outputLevelOptionalThe linear output level of the signal0 – 1.00.1
Waveshaper parameters

Because wave shaping tends to sound better when applied on a per-voice basis, it usually makes sense to set up the wave shaper at the group level (separate group effects get created for each keypress). Example:

<DecentSampler pluginVersion="1">
  <ui>
    <tab>
      <labeled-knob x="180" y="40" label="Drive" type="float" minValue="0" maxValue="1000" textColor="FF000000" value="0.5473124980926514">
        <binding type="effect" level="group" groupIndex="0" effectIndex="0" parameter="FX_DRIVE" translation="linear"/>
      </labeled-knob>
      <labeled-knob x="280" y="40" label="Boost" type="float" minValue="0" maxValue="1" value="0.328312486410141" textColor="FF000000">
        <binding type="effect" level="group" groupIndex="0" effectIndex="0" parameter="FX_DRIVE_BOOST" translation="linear"/>
      </labeled-knob>
      <labeled-knob x="380" y="40" label="Output Lvl" type="float" minValue="0" maxValue="1" value="0.1" textColor="FF000000">
        <binding type="effect" level="group" groupIndex="0" effectIndex="0" parameter="FX_OUTPUT_LEVEL" translation="linear"/>
      </labeled-knob>
    </tab>
  </ui>
  <groups>
    <group>
        <em><!-- Samples go here. --></em>
      <effects>
        <effect type="wave_shaper" drive="0.5473124980926514" driveBoost="0.328312486410141" outputLevel="0.1"/>
      </effects>
    </group>
  </groups>
Code language: HTML, XML (xml)

Examples

The examples from this blog post can be download here.