Decent Sampler v1.7.3 introduces the new wave folder and wave shaper effects. These can be used to add extra harmonic content to your signals (aka distortion). What both of these effects have in common is that they usually sound much better when applied to a single voice rather than to an entire signal. In Decent Sampler, it is possible to apply effects at the voice level by attaching them to groups. Since each group is triggered independently, they do not share effects. In other words, each time you hit a key, a new copy of that voice will be created.
Wave folder
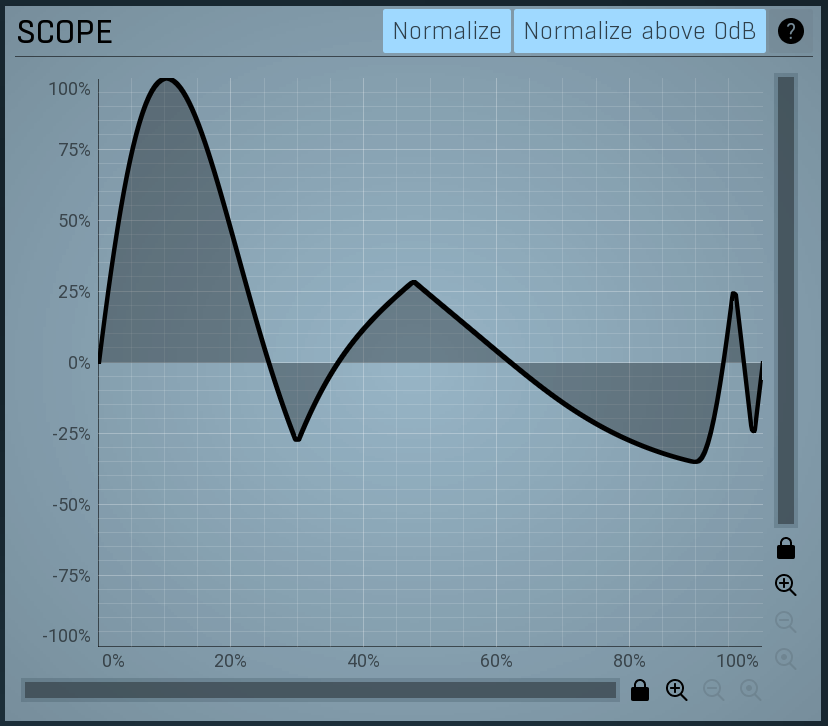
The wave_folder effect allows you to fold a waveform back on itself. This is very useful for generating additional harmonic content. Here is what that looks like in practice:

These are the parameters that can be controlled:
| Attribute | Type | Valid Range | Default | |
|---|---|---|---|---|
type | Required | Must be wave_folder | wave_folder | |
drive | Optional | The volume of the input signal | 1 – 100, where 100 means the signal is amplified by a factor of 100 and 1 means no amplification is applied | 1 |
threshold | Optional | The amplitude above which wave folding should take place | 0 – 10.0 | 0.25 |
Because wave folding tends to sound better when applied on a per-voice basis, it usually makes sense to set up the wave folder at the group level (separate group effects get created for each keypress). Example:
<?xml version="1.0" encoding="UTF-8"?>
<DecentSampler pluginVersion="1">
  <ui>
    <tab>
      <labeled-knob x="180" y="40" label="Drive" type="float" minValue="1" maxValue="100" textColor="FF000000" value="1">
        <binding type="effect" level="group" groupIndex="0" effectIndex="1" parameter="FX_DRIVE" translation="linear" />
      </labeled-knob>
      <labeled-knob x="280" y="40" label="Threshold" type="float" minValue="0" maxValue="1" value="1" textColor="FF000000">
        <binding type="effect" level="group" groupIndex="0" effectIndex="1" parameter="FX_THRESHOLD" translation="linear" />
      </labeled-knob>
    </tab>
  </ui>
  <groups>
    <group>
      <!-- samples go here -->
      <effects>
        <effect type="lowpass_4pl" resonance="1" frequency="500" />
        <effect type="wave_folder" drive="1" threshold="1" />
      </effects>
    </group>
  </groups>

</DecentSampler>
Code language: HTML, XML (xml)
Waveshaper
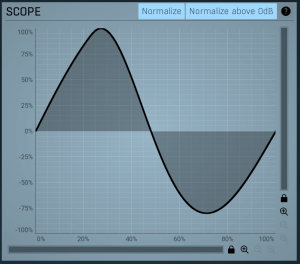
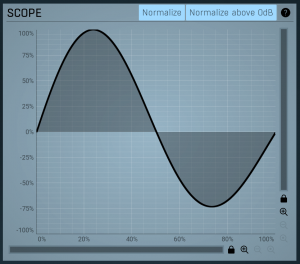
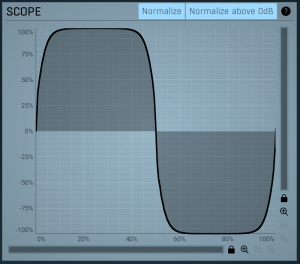
The wave_shaper effect allows you to apply standard tanh waveshaping to your input signal. Here are some examples what that looks like in practice:
There are a few parameters which can be controlled:
| Attribute | Type | Valid Range | Default | |
|---|---|---|---|---|
type | Required | Must be wave_shaper | wave_folder | |
drive | Optional | The amount of distortion. This really just controls the volume of the input signal. | 1 to 1000 where 1 means no change to the input signal and 1000 means the amplitude is multiplied by a factor of 1000. | 1 |
driveBoost | Optional | Changes the character of distortion that gets produced | 0 – 1.0 | 0 |
outputLevel | Optional | The linear output level of the signal | 0 – 1.0 | 0.1 |
Because wave shaping tends to sound better when applied on a per-voice basis, it usually makes sense to set up the wave shaper at the group level (separate group effects get created for each keypress). Example:
<DecentSampler pluginVersion="1">
  <ui>
    <tab>
      <labeled-knob x="180" y="40" label="Drive" type="float" minValue="0" maxValue="1000" textColor="FF000000" value="0.5473124980926514">
        <binding type="effect" level="group" groupIndex="0" effectIndex="0" parameter="FX_DRIVE" translation="linear"/>
      </labeled-knob>
      <labeled-knob x="280" y="40" label="Boost" type="float" minValue="0" maxValue="1" value="0.328312486410141" textColor="FF000000">
        <binding type="effect" level="group" groupIndex="0" effectIndex="0" parameter="FX_DRIVE_BOOST" translation="linear"/>
      </labeled-knob>
      <labeled-knob x="380" y="40" label="Output Lvl" type="float" minValue="0" maxValue="1" value="0.1" textColor="FF000000">
        <binding type="effect" level="group" groupIndex="0" effectIndex="0" parameter="FX_OUTPUT_LEVEL" translation="linear"/>
      </labeled-knob>
    </tab>
  </ui>
  <groups>
    <group>
        <em><!-- Samples go here. --></em>
      <effects>
        <effect type="wave_shaper" drive="0.5473124980926514" driveBoost="0.328312486410141" outputLevel="0.1"/>
      </effects>
    </group>
  </groups>
Code language: HTML, XML (xml)
Examples
The examples from this blog post can be download here.