Hello Samplists,
Here’s a list of general advice for people making sample libraries based on real-world instruments. All of this advice falls squarely into the “give advice that you yourself need to hear” category. I should also mention that this is an intermediate-level post that assumes that you already know that basics of how to make a sample library.
1. Don’t get hung up on capturing the “authentic” sound of an instrument
Think carefully about your actual goal when making a sampled instrument. When I first started, I approached the work of making sample libraries as though I was an archivist trying to preserve the “authentic” sound of a real world instrument for posterity. This is a noble goal, but it doesn’t necessarily yield the best sampled instruments. I quickly realized a much better goal was trying to make virtual instruments that are fun to play, sound good, and useful to composers or producers. And yes, sometimes these two goals are at odds with each other.
For example, when you record a piano, you may discover that some notes sound great and others sound lousy. If you are trying to be accurate, you may think you should include those lousy notes in the same, because, after all, they also represent how the instrument truly sounds. Of course, this is a valid perspective. I would argue that you should leave them out, or at very least, provide a version with a curated selection of “good” notes. The vast majority of composers and producers would rather have something that just sounds good immediately, that they don’t have to wrestle a good sound out of.
Another important thing to realize is that samplists are never getting the “true” sound of an instrument anyway. When it comes to acoustic instruments, even something as basic as where you put your microphone can drastically change the way an instrument sounds. In other words, even someone trying to capture the authentic nature of instrument is still making creative and aesthetic decisions. So give that you’re already inserting yourself into the process at the recording stage, why not continue making aesthetic decisions at every point in the process. If you record a violin sample, and it sounds harsh and grating, by all means EQ it until it sounds good! If it sounds to dry, add some reverb.
I’ve made the mistake several times of faithfully re-creating, an instrument sound, only to find that for whatever reason that sound didn’t actually work as a sample library. It’s been helpful for me to think of the source sound as the departure point on which I’m building a brand new Instrument – a virtual Instrument – that will be most likely be triggered using a piano keyboard.
2. You don’t need nearly the number of samples you think you do.
When most people are getting started, they see sample libraries releases by big sample library companies boasting about how many samples are included in a release and they will naturally think that they also need to record every note of an instrument with five different velocities and sometimes even round robins. I’m here to tell you that 9 times out of 10 this is not necessary. Most users would rather save the hard disk space. Most melodic instruments you can have a zone every 3 to 6 notes — sometimes even just one zone per octave – and it will sound every bit as good.
As you get more experienced, you will discover which instruments require more samples and which can do without. For example, one exception is when there is any sort of modulation like tremolo, vibrato or an LFO filter on a synth. If you try to pitch bend samples that have these sorts of fast, time-based modulation, you will end up with different rates of modulation depending on which note you play, which may sound terrible. In other words, use your aesthetic judgement.
3. Always pitch-bend down
If have not recorded a sample for every note, you may need to set up mapping so that pitch-bending takes place. Often, when you map samples in a sample-mapping product (such as Logic Sampler or Kontakt), the mapper will want to put the root note in the middle of a zone, meaning that if you play a play a note above the root note, it will pitchblende the note up. For example:
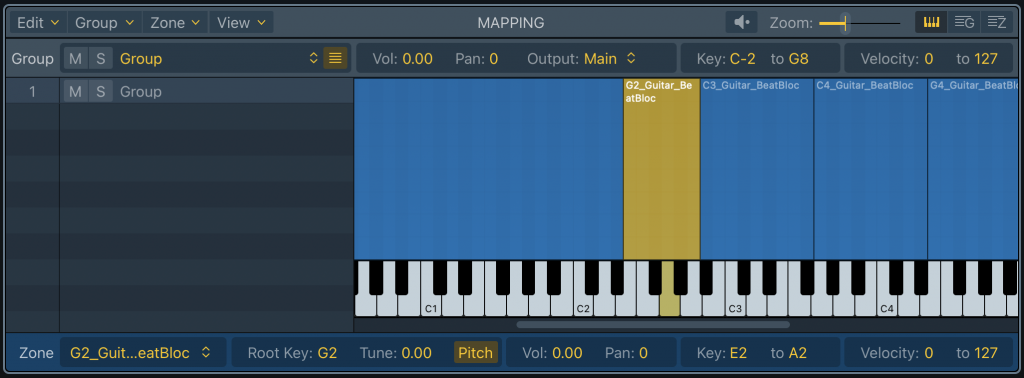
Here’s the thing: samples that are pitch-bent down almost always sound better than samples that are pitch bent up. This is because when you pitch-bend samples down, you remove some of the higher frequencies, which at worst just sounds a bit like a nice low-pass filter. On the other hand, when you pitch-bend a sample up, you are actually adding high frequencies, which can sound weird and “chipmunky.”
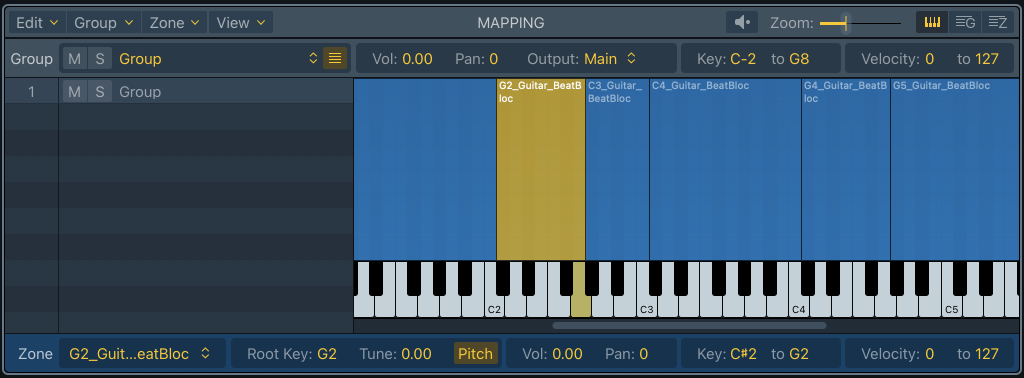
The solution is to always map your samples with the root note at the top of the range. To continue our example from above, you would get something that looks like this:
4. How to know when your instrument is done and ready to release
This is easy. Your sample is done when you can’t stop playing with it. When every time you open it up the library, you get distracted and start writing music. You are your own first customer, so be honest with yourself. If your own reaction to playing with a library is a tepid “I guess this is good?” then there’s something wrong. Figure out what’s bothering you about the sounds and fix them.
Hope this little list has been helpful. As I think of more things, I will go back and update this document as more things occur to me.
All the best,
Dave