As of version 1.13.3, Decent Sampler now has a simple, old school pitch shift effect. This is a classic, delay-based implementation that can be found in a lot of 90s-era digital pitch shifters. It should be useful for adding old-school grit or faking a tape-recorder warble. Usage is pretty straightforward:
<DecentSamplerminVersion="1.13.3"><ui><tab><labeled-knobx="375"y="75"width="90"textSize="16"textColor="AA000000"trackForegroundColor="CC000000"trackBackgroundColor="66999999"label="Pitch Shift"type="float"minValue="-24.0"maxValue="24.0"value="0"><bindingtype="effect"level="group"groupIndex="0"effectIndex="0"parameter="FX_PITCH_SHIFT"/></labeled-knob><labeled-knobx="445"y="75"width="90"textSize="16"textColor="AA000000"trackForegroundColor="CC000000"trackBackgroundColor="66999999"label="Mix"type="float"minValue="0.0"maxValue="1.0"value="1"><bindingtype="effect"level="group"groupIndex="0"effectIndex="0"parameter="FX_MIX"/></labeled-knob></tab></ui><groupsattack="0.000"decay="25"sustain="1.0"release="0.430"ampVelTrack="0.5"><group><!-- ... samples go here ... --><effects><effecttype="pitch_shift"pitchShift="0.0"mix="1"enabled="true"/></effects></group></groups></DecentSampler>Code language:HTML, XML(xml)
The two parameters of the pitch_shift effect can also be modulated as follows:
As a DecentSampler user, you’ve likely spent time tweaking and perfecting your sound. But what if you want to save these settings for future use? Good news! DecentSampler allows you to save user presets for any library you’re currently using. Here’s how to do it:
Step 1: Convert Your Library Format
Before you can save user presets, you need to ensure your library is in the correct format. Specifically, if your library is in a .dslibrary format, you must first convert it to either a .dsbundle or a folder-based preset.
Method 1: Converting .dslibrary files using Decent Sampler
The easiest way to convert a .dslibrary file is by using the DecentSampler plug-in itself:
Simply drag that .dslibrary file onto the DecentSampler plug-in window.
You will see a box that says Do you want to install this preset?, click Yes.
DecentSampler will decompress the .dslibrary file and create a new .dsbundle directory wherever you keep your sample libraries. For a list of the default sample library locations, see here.
Method 2: Manually Method
If Method 1 doesn’t work for some reason, you can also convert the file yourself. At their core, .dslibrary files are just .zip files with a different extension.
Change the extension on the .dslibrary file to .zip.
Decompress the .zip file and put it wherever you store your sample libraries. If you are on macOS or Windows, this will be as easy as simply double-clicking the .zip file.
Step 2: Set Up Your Sound
Now that your library is in the correct format, load it and adjust the parameters to your liking. This could include changes to the envelope, filter settings, effects, or any other adjustable parameters within the library.
Step 3: Access the FILE… Menu
Once you’re happy with your sound, look for the FILE… menu. This is typically located at the top of the DecentSampler interface.
Step 4: Choose “Developers Tools > Save Preset…”
In the preset menu, you should see an option to “Save Preset…”. Click on this option.
Step 5: Select Save Location and Name Your Preset
A dialog box will appear, prompting you to save your preset. It is important that you save the preset in the same location as the other presets for this library – DecentSampler will usually suggest the correct location as the default location. Choose a name that’s descriptive and easy to remember. For example, “Warm Pad with Long Release” or “Punchy Bass with Distortion”.
Step 6: Confirm and Save
Once you’ve named your preset, click “Save” or “OK” to confirm. Your preset is now saved and ready for future use!
Accessing Your Saved Presets
To use your saved preset in the future:
Load the same library you used when creating the preset (remember, it must be the .dsbundle or folder-based version).
A box will pop up showing you all of the presets that belong to that library.
Find and select your new saved preset.
Remember, user presets are specific to the library you’re using. A preset saved while using one library won’t be available when you’re working with a different library.
Happy sampling, and enjoy the convenience of your personalized DecentSampler presets!
I have added a few things to the sampler in version 1.9.18:
There’s experimental support for FLAC files.
It’s now possible to assign knobs to the start and end point of samples, as well as their loop points.
It’s now possible to dictate the playback engine that is used by a sample library.
Now, the first item above is probably pretty self-explanatory, this blog post is going to concern itself with items 2 and 3.
How To Manipulate Start, End, and Loop Points
To change a sample’s start, end, loop start, or loop end, simply use the SAMPLE_START, SAMPLE_END, LOOP_START, and LOOP_END parameter names, respectively. Here is some sample code:
In order for this to work properly the sample playback engine must be in RAM/Memory mode (not disk streaming), otherwise you will get very unpredictable results. In order to enforce this, sample creators should use the new playbackMode attribute, which is explained in the next section…
Playback Engines
As you may know, there are two playback modes: the memory mode stores a samples in memory, whereas the disk streaming mode caches only the beginning of each sample, and then uses a series of threads to grab data as needed. Because the memory mode has all of the data it could possible need in its memory already, it is far more flexible in terms of what can be accomplished with it, but, since it loads the entire sample into memory, it can also use up a lot of RAM for large sample libraries. Currently, users can change their playback mode by going into the preferences screen and choosing a new Sample Engine Mode:
97% of the time, this is exactly what you want: the user choosing their own playback system. The problem is that some sample libraries work much better with one mode vs the other. If the sample library has knobs bound to start, end, loopStart, or loopEnd, then being in RAM mode is actually required. Of course, no sample creator wants to have to tell their users “Oh, by the way, make sure you switch playback modes in the preferences before you use my new sample library.” The solution is the playbackMode attribute. It has three possible modes: memory, disk_streaming and auto(default). When a value of memory is used, the sample will be played back using the memory mode as though the user had that playbackEngine selected in the preferences.
Occasionally, users will reach out and ask me whether it’s possible to extract the samples contained in a Decent Sampler library. One common use-case for this is users who want to use the samples with a hardware sampler such as an MPC or an SP-404. Anyway, the answer to the question is that in some cases it’s possible and in others it is not.
Me: “Are you sure you really want to do this?”
Before we go into the details of when it’s possible, it’s worth mentioning that a Decent Sampler instrument is usually much more than just a collection of samples: a creator of a library will often have made use of creative layering techniques as well as onboard effects, both of which play a huge part in producing the distinctive sound of a library. This means that the only reliable way of getting the intended sound of a library is to actually use the output from DecentSampler as your sound. This doesn’t mean that you are out of luck if you want to use these sounds with a hardware sampler. You can always load DecentSampler up in your DAW of choice, play a bunch of long notes, and then export the audio out from that session. This will often yield better sound than if you were to just go directly into the sample library and grab the underlying samples.
You: “OK, but I still want to do it!”
So, assuming that you really do want to grab the underlying audio files, here’s what you need to know. First, if the sample library is a commercial release and copy-protected then you are out of luck: the underlying wave files will all encrypted and the only thing that can decrypt them is the DecentSampler plugin itself. In such cases, the only thing that you can do is go into your favorite DAW, play any notes you might want to have as audio files, and export out the audio from that DAW session. This is always my preferred way of operating anyway.
If the library is not copy protected, then you should definitely be able to get at the underlying samples. In fact, it’s pretty easy. There are two formats that DecentSampler libraries come in:
If you are presented with a .dsbundle file, this is really just a directory. If you are on Windows or Linux, you should be able to just look inside that directory and find the sample files. If you are on Mac, this file will show up as a “package.” To get access to it, find the file in the Finder, hold down the Control key, and then click on the file: a context menu will pop up, from which you should select Show Package Contents. From this point on, the .dsbundle file will be presented to you just like any other folder…and somewhere in that folder you will find the raw audio files. The exact location will be different for every library.
If you are presented with a .dslibrary file, then you will need to decompress it. In reality, .dslibrary files are simply .zip files, and if you change their extension from .dslibrary to .zip you should be able to decompress the library just as you would any other .zip file. Within the directory structure that gets created, you should be able to find a folder that contains your samples.
Here’s a list of general advice for people making sample libraries based on real-world instruments. All of this advice falls squarely into the “give advice that you yourself need to hear” category. I should also mention that this is an intermediate-level post that assumes that you already know that basics of how to make a sample library.
1. Don’t get hung up on capturing the “authentic” sound of an instrument
Think carefully about your actual goal when making a sampled instrument. When I first started, I approached the work of making sample libraries as though I was an archivist trying to preserve the “authentic” sound of a real world instrument for posterity. This is a noble goal, but it doesn’t necessarily yield the best sampled instruments. I quickly realized a much better goal was trying to make virtual instruments that are fun to play, sound good, and useful to composers or producers. And yes, sometimes these two goals are at odds with each other.
For example, when you record a piano, you may discover that some notes sound great and others sound lousy. If you are trying to be accurate, you may think you should include those lousy notes in the same, because, after all, they also represent how the instrument truly sounds. Of course, this is a valid perspective. I would argue that you should leave them out, or at very least, provide a version with a curated selection of “good” notes. The vast majority of composers and producers would rather have something that just sounds good immediately, that they don’t have to wrestle a good sound out of.
Another important thing to realize is that samplists are never getting the “true” sound of an instrument anyway. When it comes to acoustic instruments, even something as basic as where you put your microphone can drastically change the way an instrument sounds. In other words, even someone trying to capture the authentic nature of instrument is still making creative and aesthetic decisions. So give that you’re already inserting yourself into the process at the recording stage, why not continue making aesthetic decisions at every point in the process. If you record a violin sample, and it sounds harsh and grating, by all means EQ it until it sounds good! If it sounds to dry, add some reverb.
I’ve made the mistake several times of faithfully re-creating, an instrument sound, only to find that for whatever reason that sound didn’t actually work as a sample library. It’s been helpful for me to think of the source sound as the departure point on which I’m building a brand new Instrument – a virtual Instrument – that will be most likely be triggered using a piano keyboard.
2. You don’t need nearly the number of samples you think you do.
When most people are getting started, they see sample libraries releases by big sample library companies boasting about how many samples are included in a release and they will naturally think that they also need to record every note of an instrument with five different velocities and sometimes even round robins. I’m here to tell you that 9 times out of 10 this is not necessary. Most users would rather save the hard disk space. Most melodic instruments you can have a zone every 3 to 6 notes — sometimes even just one zone per octave – and it will sound every bit as good.
As you get more experienced, you will discover which instruments require more samples and which can do without. For example, one exception is when there is any sort of modulation like tremolo, vibrato or an LFO filter on a synth. If you try to pitch bend samples that have these sorts of fast, time-based modulation, you will end up with different rates of modulation depending on which note you play, which may sound terrible. In other words, use your aesthetic judgement.
3. Always pitch-bend down
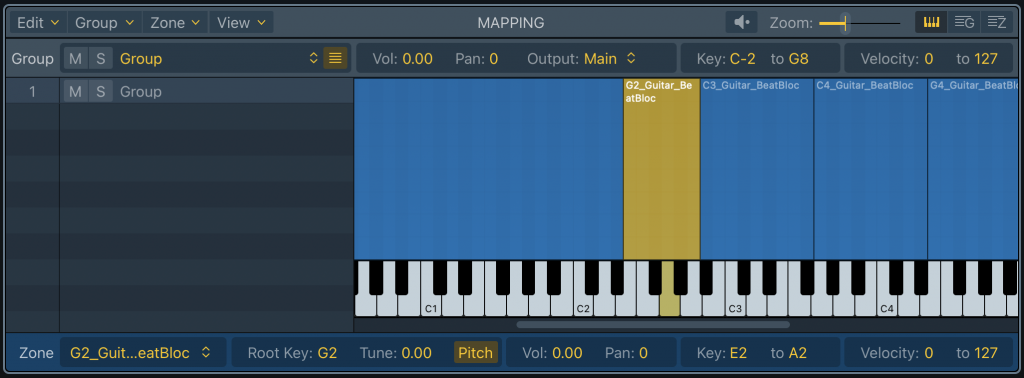
If have not recorded a sample for every note, you may need to set up mapping so that pitch-bending takes place. Often, when you map samples in a sample-mapping product (such as Logic Sampler or Kontakt), the mapper will want to put the root note in the middle of a zone, meaning that if you play a play a note above the root note, it will pitchblende the note up. For example:
Here’s the thing: samples that are pitch-bent down almost always sound better than samples that are pitch bent up. This is because when you pitch-bend samples down, you remove some of the higher frequencies, which at worst just sounds a bit like a nice low-pass filter. On the other hand, when you pitch-bend a sample up, you are actually adding high frequencies, which can sound weird and “chipmunky.”
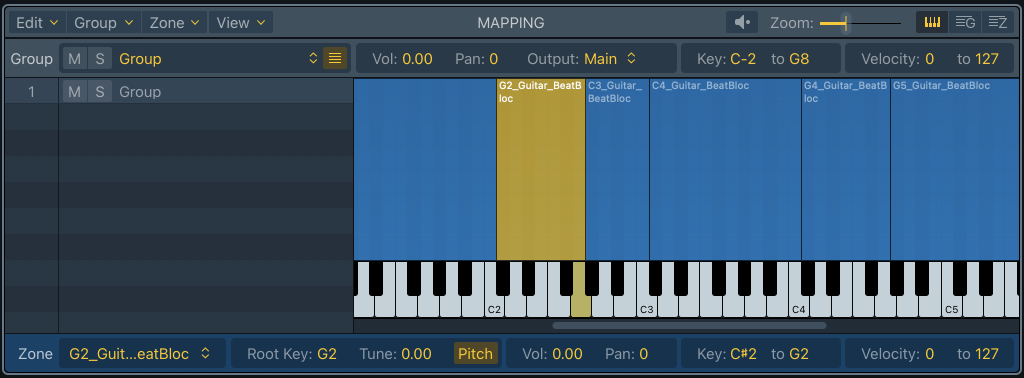
The solution is to always map your samples with the root note at the top of the range. To continue our example from above, you would get something that looks like this:
4. How to know when your instrument is done and ready to release
This is easy. Your sample is done when you can’t stop playing with it. When every time you open it up the library, you get distracted and start writing music. You are your own first customer, so be honest with yourself. If your own reaction to playing with a library is a tepid “I guess this is good?” then there’s something wrong. Figure out what’s bothering you about the sounds and fix them.
Hope this little list has been helpful. As I think of more things, I will go back and update this document as more things occur to me.
Version 1.4 of Decent Sampler recently got released: Download it here.
It brings with it a number of under-the-hood features that sample developers can make use of:
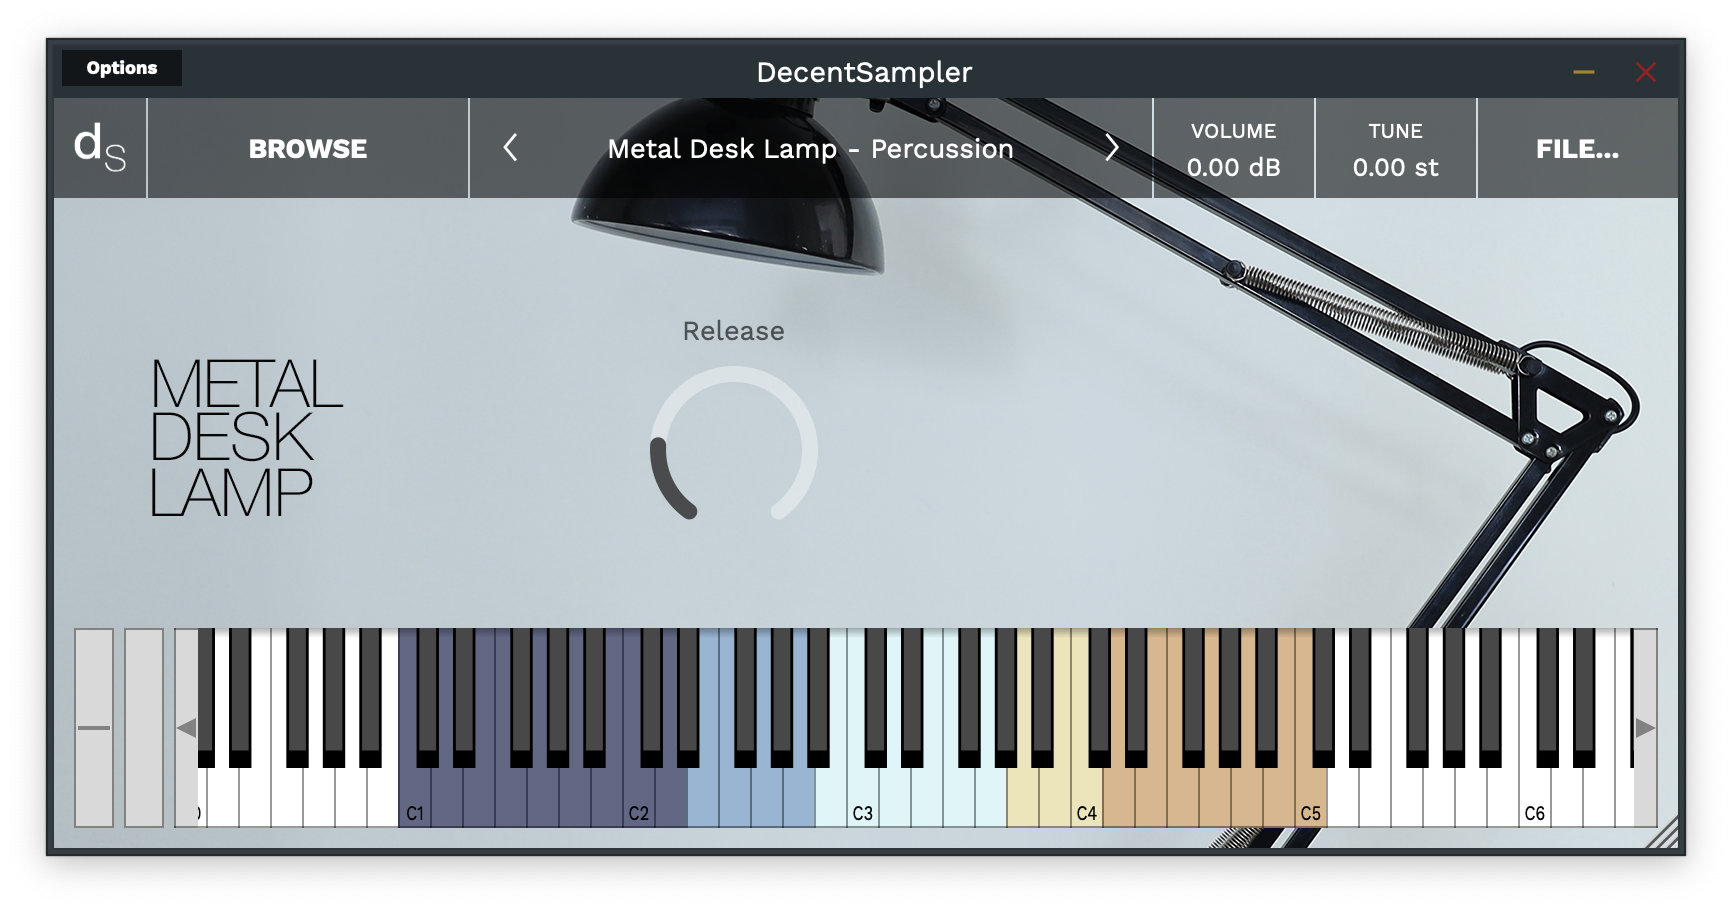
Colored Keys
It’s now possible to color the keys of the on-screen keyboard.
This can be useful for showing different ranges of notes that serve different purposes or highlighting notes used as keyswitches. In order to implement colored keys, make use of the new <keyboard> and <color> elements as follows:
<DecentSampler><ui><em><!-- Other stuffhere --></em><keyboard><colorloNote="36"hiNote="50"color="FF2C365E" /><colorloNote="51"hiNote="57"color="FF6D9DC5" /><colorloNote="58"hiNote="67"color="FFCCF3F5" /><colorloNote="68"hiNote="73"color="FFE8DA9B" /><colorloNote="74"hiNote="84"color="FFD19D61" /></keyboard></ui><em><!-- Other stuff here --></em></DecentSampler>Code language:HTML, XML(xml)
By default, Decent Sampler highlights all of the notes that are mapped for a given sample. If you use the color keys feature, this default highlighting will be turned off and it will be up to you to color whatever keys you want.
In order to implemented dropdown menus, use the new <menu> and <option> elements. The <menu> element defines where the dropdown menu will show up in the ui, whereas the <option> XML elements determine what menu options it has and what if anything those options actually do:
<menux="10"y="40"width="120"height="30"value="2"><optionname="Menu Option 1"><!-- Turn on this group --><bindingtype="general"level="group"position="0"parameter="ENABLED"translation="fixed_value"translationValue="true" /><!-- Turn off this group --><bindingtype="general"level="group"position="1"parameter="ENABLED"translation="fixed_value"translationValue="false" /></option><optionname="Menu Option 2"><!-- Turn off this group --><bindingtype="general"level="group"position="0"parameter="ENABLED"translation="fixed_value"translationValue="false" /><!-- Turn on this group --><bindingtype="general"level="group"position="1"parameter="ENABLED"translation="fixed_value"translationValue="true" /></option></menu>Code language:HTML, XML(xml)
In this example, a menu is being used to switch between two groups (the first menu option turns group 0 on and group 1 off; the section option turns group 0 off and group 1 on). Full documentation for the new <menu> and <option> elements is here.
The new fixed_value translation type
You’ll note, in the example above, there’s something new in the bindings: the four bindings elements have a translation parameter of type fixed_value. This is a new translation type. Up until now, binding translation has strictly been about taking an input parameter (such as a knob value or continuous controller amount) and translating it so that it is useful for some other purpose (it’s our way of being able to do a little bit of math without having a full-blown scripting language). This new fixed_value binding is different. It ignores the input value completely and instead provides whatever is specified in the translationValue parameter. In this way, each menu option can have hardcoded values that it provides its bindings when it is selected.
Keyswitches
It is now possible to implement keyswitches. For a long time, it’s been possible to trigger events when a MIDI continuous controller event is received: using MIDI CCs we can change knob values or group volumes, for example. It is now possible to trigger events using MIDI notes as well. Here’s what the setup for a MIDI note-based event mapping would look like:
In this example, MIDI note 11 turns on group 0 and turns off group 1, whereas MIDI note 12 does the opposite. Note the use of the fixed_value translation type.
We’ve created a Kontakt template that should be perfect for people trying to build piano instruments in Kontakt. The basic idea behind the template is that it it should allow you to build a piano instrument in Kontakt 5/6 without doing much scripting. Check it out!
We’ve made a new Kontakt scripting tutorial in which we show how to work with piano samples. Topics covered: distinct samples for sustain and non-sustain, release triggers, and pedal up/down sounds.